
How to setup an Einstein Chatbot in Salesforce
- Liubomyr Holko

- Aug 23, 2023
- 8 min read
Updated: Mar 20, 2024
In this article, we will discuss Einstein Chatbot and consider Omni-Channel, Lightning Knowledge Base, Embedded Service Deployment, and more.
Salesforce Einstein Chatbot Features
The first point to note: this functionality is available for Service Cloud User and Chat User feature licenses in Enterprise, Performance, Unlimited, and Developer editions. Chat User feature license can be obtained by purchasing Digital Engagement, an add-on for Service Cloud. Also, a significant limitation is that 25 bot conversations per month are available for each Digital Engagement license. If they are not enough, you can purchase Additional Einstein Bot Conversations, which provides 100 additional monthly conversations for $50. Prices are current at the time of writing.
Salesforce Einstein Chatbot Setup
First of all, set up a regular chat without the Einstein bot. Go to Setup > Chat Settings > Enable Chat > Save to do this. The settings, which appear after activating the chat, leave as default.

After that, go to Service Setup and select View All on the “Recommended Setup” component.

Find Chat with Customers.

Skip the first step, and enter the name of a queue and a group in the second. For example, Queue Name = Cases Queue, Name This Group = Support Group. Next, select the desired user from below.

Now let's configure the workload of agents in the chat.
There are two parameters to configure:
Work Item Size - describes the workload of a record per agent.
Agent Capacity - describes the total workload of an agent.
In this case, one record will have 5 conventional load units, and the total will have 20 conventional units. Accordingly, up to 4 records can be assigned to one agent at the same time. Later, to change these parameters, go to Setup > Routing Configurations and change the Units of Capacity field in the required configuration to change the load of one record per agent. Also, Setup > Presence Configurations, and in the desired configuration, change the Capacity field to change the total workload per agent.

Next, specify a link to the site where this chat will be used. If you have an existing site, you can include this link. The link to the Public Site is provided in the example. You can choose any available domain by searching through the options.

In the next step, choose the chat range of use: what records will be created when the user initiates the chat. Available options:
Creating Leads
Creation of Cases and Contacts
Creating Contacts

Do you need offline support? Let’s say you don't need that kind of functionality right now, so skip it. If necessary, it can be added later in Setup > Embedded Service Deployments > View > Chat Settings > Offline Support.

Salesforce will then start the setup process, which will take a few seconds.

As a result, you will get a piece of script that should be inserted on every web page of the site where you want to use the chat. It is recommended to insert this script before the HTML tag.

Copy the script and try to paste it on the site, and check the performance of the newly configured functionality. If you don't have your own site, you can create a Visualforce page with this code. The Public Site is used for the example, the created page is a Home Page. To do this, go to Setup > Sites > Edit. Click on the search icon near the Active Site Home Page, choosing the desired page. Then save the changes.

Open a new tab and go to App Launcher. Select Service Console. On the Utility Bar component, click on Omni Channel > Available - Chat.

Let's act as a client. Go to the website where you will see the Chat with Agent button in the lower right corner. Click on it and enter your data.

From the agent support side, you can see that a Chat Transcript record has been created.

On record you will have the opportunity to communicate with the client in real time.

However, this approach has a number of critical points, in particular:
A large number of agents to process all requests on time;
Agents must work around the clock;
Low CSAT (Customer Satifaction Score) due to a long wait for problem resolution;
Some requests have the same type of problems.
It would be better to avoid such negative consequences. So, let's add a chatbot that will work 24/7, will be able to serve an infinite number of customers simultaneously, and will prepare answers for similar routine problems.
Preliminary preparation before implementing the bot requires only going to Setup > Einstein Bots > enable Einstein Bots.

Let's create a new instance of the Einstein chatbot by clicking “Create a New Bot” below.
There are two types of bots: standard and enhanced. Let's not focus on their differences. If you are interested in this topic, you can read about it here. Currently, choose the standard one.

Choose the Intro Template and modify it for your own needs, instead of doing everything from scratch.

Name the bot and choose the language.

The bot will specialize in customer support, so exclude unnecessary options.

Let's skip this step; we'll talk about it a little later.

At the end, click on the Proceed button to complete the settings.

If everything is configured correctly, then a green checkmark will appear near each item, and the Finish button will be available.

You will be redirected to the Einstein Bot Builder page. Familiarize yourself with the standard flow. To do this, select Map instead of Detail in the picklist.
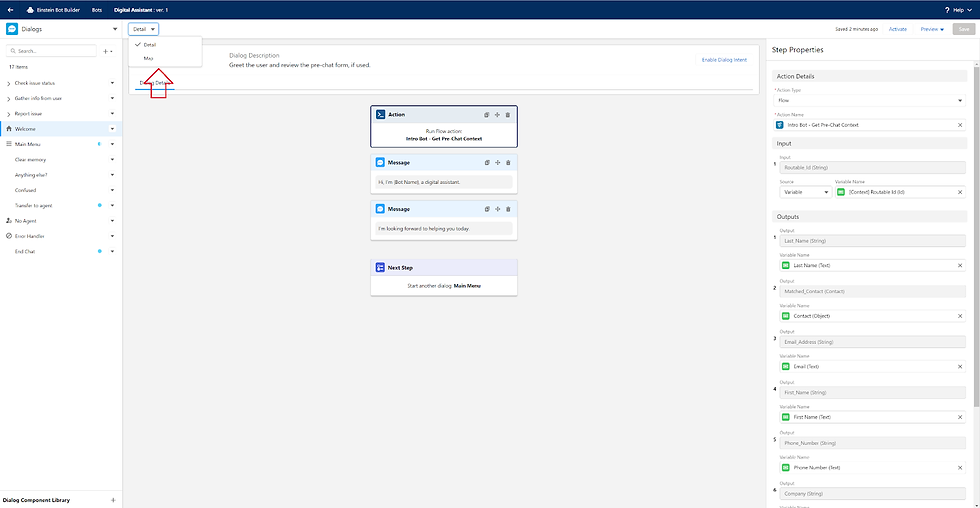
The bot works according to the following principle:

At first glance, the scheme may seem cumbersome and confusing but don’t worry because it is not. You will learn everything easily after you start working with it. Also, it is similar to the diagrams in Flow Builder, so if you have experience working with Flow, it will be a good advantage and will facilitate the process of exploring this diagram.
One step was skipped during the bot setup, and as promised, we're coming back to it. Let's connect the bot to the chat. To do this, go to the Overview tab.

Find the Connections section and click Add.

Select Connection = Chat, Deployment = the group name you initially specified. In this case, it's the Support Group. Leave Require Agent Online disabled.
In the Bot Response Delay section, you can configure the bot's delay before each message is sent, which simulates the typing speed.
There is an option to save conversation data. To get this option, you must enable Store Einstein Bots conversation data in the Log Conversation section. This feature comes in handy when you have problems with unexpected behavior, so we strongly recommend that you include it during development. However, it is worth remembering that this feature can store some sensitive data, so it is recommended, even required, to turn it off in a production organization.
Also, let's configure the user on whose behalf the transaction will be launched. To do this, click on the pencil icon in the Bot User section, and in the "Bot performs actions as" section, select Custom Chatbot User (Recommended) and find your user.
Following these steps, the bot should have the following settings:

Finally, activate the bot in the upper right corner.

Perfect! The basic setup is complete. We suggest checking the bot's performance at this stage. Go to the resource (website or public site) and start a conversation.

Unlike regular chat, as a support agent, you won't see a new record in Omni-Channel because now the bot is actually taking the chat for us.

The chat starts automatically, and at this stage, you have two options: “Report an issue” and “Check the status of an existing issue”.

Let's act as a client who has encountered a certain problem that they want to report. To do this, select Report an issue and describe the problem.

Specify data for feedback

and the company name.

After that, you will see that the case was successfully created, and you also received a number to track the progress of your request processing.

If you return to the main menu, select “Check the status of existing issue”, and specify the data so that the bot finds exactly our case,

then, as a result, you will receive the status of our case and an offer to add a comment to it.

When the support service agent comes to the workplace, they will see the created case without their participation. The agent will solve the problem and call the client back or reply to the email. Also, the agent will be able to see the bot's correspondence with the client and related records that were created during the conversation.

Let's imagine a situation where the client has a specific question for which they need to contact an agent instead of creating a case. To provide this opportunity to clients, go to Setup > Einstein Bots > select a bot > Main Menu > add “Transfer to Agent” to the menu.

Save and activate the bot. It is important to understand that transferring to an agent is only available if the agent is online.
An opportunity to talk to an agent causes the problem of a bigger workload on the employee. We suggest setting up the Lightning Knowledge Base so that customers can first try to find a solution to their problem on their own, and if that doesn't solve the problem, then contact an agent.
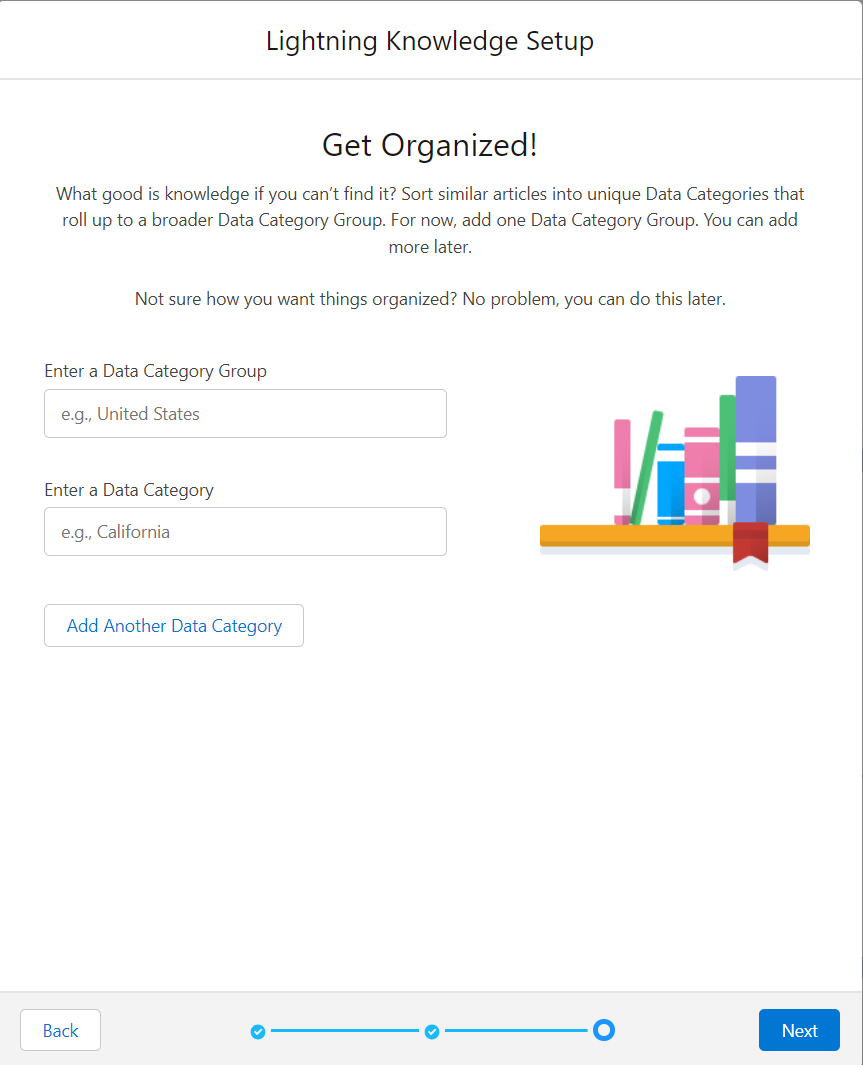
Again, go to Service Setup > Recommended Setup > View All > Knowledge Setup.

Note that once you enable Lightning Knowledge, you cannot disable it.
Select a user who will have access to creating articles.

There is an option to create categories for Knowledge Articles records, but now let’s skip this step.
You need to fill a database with Knowledge Articles records and generate an artificial intelligence model that will search for relevant articles based on a question entered by the user. The minimum number for model generation is 10 records. To start the learning process, go to Setup > Einstein Bots > Smart Features > Get Started.

After that, map the required fields and start the training process, which can last quite a significant period of time. The minimum time for training is 30 minutes.

After completing the training, go to Overview in Einstein Bot Builder. In the Settings section, find Article Answers. Enable this option.

Return to the Dialogs tab. You will see that a new Article Answers dialog has appeared.

Optionally, you can change the process that occurs when this dialogue is initiated. Now let's leave it unchanged.
After asking a question, the bot will trigger the search of the knowledge base, and the system will find the most relevant articles according to the given question. If there is no answer to the question in the database, in this case, the bot offers to try again. Also, you can customize the dialogues. For example, create a flow that will collect information about unsuccessful attempts to find an answer and store this data in SF so that in the future, you can improve the knowledge base and increase the level of customer satisfaction. If you are interested in this topic, we suggest you continue an independent study with such topics as:
- Enhanced Einstein Bots - improved chatbots; Dialog Intents – for routing the client to different dialogs based on the entered text; - Multiple Languages Knowledge Base – to localize the Lightning Knowledge Base into different languages; - Multiple Languages Einstein Bot – for localization of bot dialogues in different languages; - Flow/Apex - to expand the capabilities of the bot; Omni-Channel - a deeper exploration of this topic for effective distribution of chats between help desk agents; - Supervisor Configurations – to create a system of control over support service agents and help with solving customer issues.
To sum up
So, here is a summary of the work we done:
Chats with the user are configured.
Added a script to the Visualforce page.
The page with the script has been moved to the Public Site.
The bot is enabled and configured.
Lightning Knowledge Base has been set up.
Articles with frequently asked questions have been added.
We trained an AI model to enable users to find answers to frequently asked questions independently.

Let's unlock the full potential of Salesforce for your business
Our team has successfully implemented and customized Salesforce for many businesses, resulting in increased revenues and greater customer satisfaction. Let's talk about your case!


Comments